One of the building blocks of running an AWS EC2 instance is called the VPC or Virtual Private Cloud. The VPC system allows you to create shared or segmented networking blocks for the various EC2 instances that you will run.
The really boring Security conversation...
Fundamentally the level of security you can provide between instances and anything else - other instances or the Internet in general - is dictated by how you construct your VPC topology. In general terms, one large shared VPC with no restrictions is bad. The other extreme of a VPC per instance is, while technically possible, also overly complicated and doesn't actually provide more security and instead more opportunities to configure things badly.
I did warn in the title that a boring security conversation was going to happen right? ;)
A nice middle-ground between over-simplification and over-complication is where you want to be. If you haven't been architecting networks and implementing servers in them for many years, then I'm going to recommend you put all birds of a feather in common cages so that (in this analogy at least) you can try to achieve some colour coordination. From a DevOps perspective, this means we are going to lump all our development instances together in one VPC, and keep that separate to our operations instances, and again separate to our production instances. As such, the simplest model I would ever recommend is going with a minimum of three VPCs:
- Development
- Operations
- Production
In this model, the Development and Production VPCs should (read 'must') never initiate connections to each other. For specific services such as a log aggregator or a yum server holding rpm images, the Operations VPC can have connections inbound. The Operations VPC should (again, read 'must') be the only area that can initiate connections directly to the instances within the Development or Production VPCs.
You will of course have public facing connections incoming to Development or Production, but unless there is an unsurmountable technical reason to not use a load balancer (AWS call them an ELB or Elastic Load Balancer), then you should never have direct connections to the instances from the Internet either. Load balancers provide more than just High Availability (HA), but also allow for some direct control and also protocol translation between the Internet and the internal instances. This also helps us comply with the fairly strict requirement of only allowing Operations to initiate internal connections to Development or Production.
In case you have already made the logical leap to 'what about SSH for debugging from the office?' as a question, there are two key ways to get connected without necessarily allowing the entire world to have a go at hacking your servers.
VPN
Setting up a VPN server in your Operations VPC is easily seen as the most secure way of achieving access to any server from anywhere that has the right authentication. Therein lies probably the biggest issue with the security of this approach though - anybody that has the right authentication can also mean anybody that compromises that authentication, or even grabs the relevant authentication details from your workstation.
If you do go this route, ensure your VPN requires Multi-Factor-Authentication (MFA) using TOTP (Time based One Time Password) in addition to a public/private key pair. Never store the 'secret' part of the TOTP system on the same device as where the private key is also held and you will make compromising the VPN authentication nigh impossible without the hacker and yourself being in the same physical location. It's actually simpler to implement (PAM modules on Linux are great for this) than it sounds, but does add additional overhead of having a VPN server (or two!) to care about. Also, if not implemented correctly it provides only the pretence of good security.
If implementing a VPN, I always back this up with a process for implementing the alternative model in a hurry by manipulating Security Groups within the AWS console.
Security Groups
In the end, Security Groups are part of your controls into your servers. They work as an additional layer to the ACL (Access Control List) component of the VPC system, and are used to allow access. You can only tell a Security Group to deny traffic by not specifying the port/IP combination. The ACL system on the other hand is able to be used for both enabling and disallowing connections. EC2 instances only know about Security Groups so I've always found it best to only use the ACL system for disallowing specific IP addresses absolutely when needed, and then using Security Groups for detailing what can connect in general. My general ACL rules as a result look similar to the below (sorry whoever is currently using 1.2.3.4/32!). IP addresses in ACLs and Security Groups are defined using Classless Inter-Domain Routing (CIDR) notation, click the link if you want to know more. Rule 1 doesn't always exist (or there is more than one when there are multiple denies).
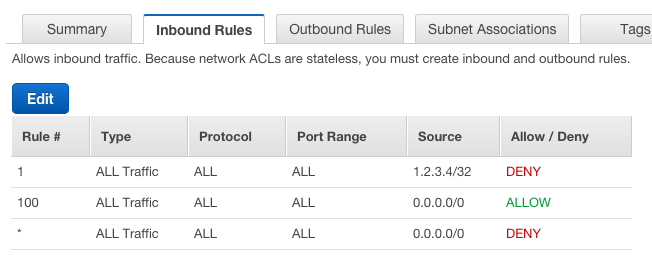
Now that we have digressed somewhat, lets move back to talking about Security Groups. Because a Security Group is designed to allow access, if you don't specifically allow a port and IP combination in a Security Group, then that connection will not be able to be made. If you set up a block behind that Security Group within the ACL then even if the Security Group is enabled then the connection will still not be able to be created.
Putting a deny in an ACL is far easier than breaking up an existing Security Group in order to avoid allowing access within a larger range. For example, just using Security Groups in my ACL example above would mean blocking 1.2.3.4 would look like:
0.0.0.0/8
1.0.0.0/15
1.2.0.0/23
1.2.2.0/24
1.2.3.0/30

1.2.3.5/32
1.2.3.6/31
1.2.3.8/29
1.2.3.16/28
1.2.3.32/27
1.2.3.64/26
1.2.3.128/25
1.2.4.0/22
1.2.8.0/21
1.2.16.0/20
1.2.32.0/19
1.2.64.0/18
1.2.128.0/17
1.3.0.0/16
1.4.0.0/14
1.8.0.0/13
1.16.0.0/12
1.32.0.0/11
1.64.0.0/10
1.128.0.0/9
2.0.0.0/7
4.0.0.0/6
8.0.0.0/5
16.0.0.0/4
32.0.0.0/3
64.0.0.0/2
128.0.0.0/1
That blank line? well thats 1.2.3.4/32. This is overkill for when you just want to block the one IP. My actual security group just uses 0.0.0.0/0 to denote 'the entire Internet' and the ACL blocks the single IP without the need for many Security Group rules.
Alternatively to just allow 2.3.4.5/32 to connect over HTTPS, you keep the ACL rule as is (1.2.3.4/32 still can't connect, sorry! Neither can the rest of the Internet, so don't feel too bad), just specify the following in your Security Group:

All this was to say 'Security Groups can be used to specify only your Office IP address can connect directly to instances within your VPCs'. This means you can easily put IP restrictions on what can connect directly to the systems running within your VPCs.
It is possible to implement each allow rule in both a Security Group and ACL. This is 'best practice' in that you would have to make the same mistake twice to allow access where you didn't intend access to be granted, but in reality all does is create situations where what looks like it should work (Security Group configured correctly) gives a false negative issue on a server (ACL not configured correctly) where the actual problem lies with the ACL and not the instance. Sometimes people forget they are using both and that can take a while to diagnose as well.
I mentioned in the VPN answer that you can use Security Groups as a backup for if you lose all connectivity to the VPN server(s). Having a Security Group already implemented with no rules (i.e. nobody can connect) is a good idea in that situation, as you can then easily modify the security group to give direct access from your current IP address temporarily. And therein lies the crux of the security issue - its easy to modify the controls to allow access if you have the authentication details to the system where the controls are configured. Hence, always use a MFA on every account with this sort of access.
A final note on potential security issues - accounts with AWS Access Keys with * access to EC2 can also modify Security groups, so be careful where you allow that level of access via AWS Access Keys.
All these words and no actual actions! Put it down to liking everybody to be on the same page before configuring a security system, as not having an inkling on why you do something can lead to disaster down the road. The best analogy here is teaching somebody how accelerate a car without telling them there are brakes or how to use them.
Before we continue, you will probably already noticed that a VPC already existed (172.31.0.0/16) in your account. This is deemed the 'default' VPC and while it is possible to delete it if you aren't using it, I like leaving it around as you can't recreate the default VPC without direct AWS staff help. Lets just put it down to 'being ignored' from this point on, although you may find you add instances to it by accident in the future as the default VPC is used as just that, a default. A default you should always override as you want to only ever put production servers in a production VPC, and defaults are bad from that perspective. Don't be that DevOps person with something in the default VPC ;)
Creating a VPC
There are two ways to create a VPC. Within the Dashboard of the VPC console is a 'Start VPC Wizard' button. It gives you 4 options, but unless you are wanting to spend money on hardware or running a Network Address Translation (NAT) instance, you will end up choosing option 1. The other way is to create each component individually, but where is the fun in that? :)
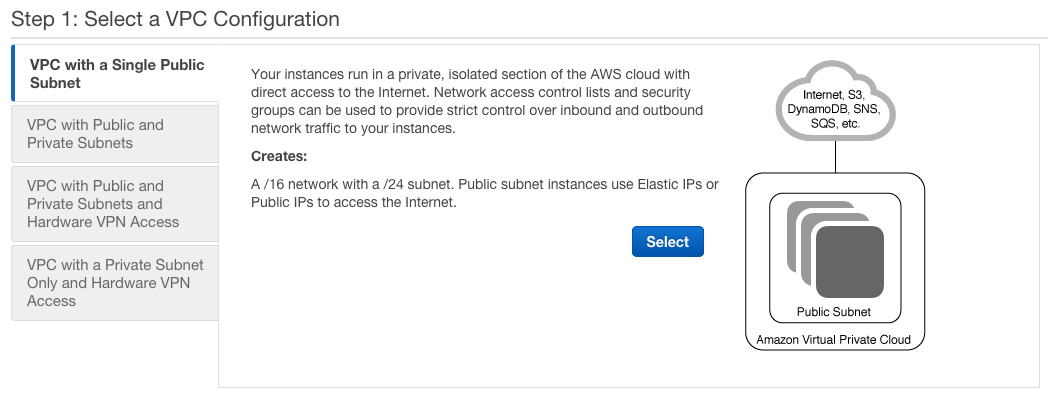
The other 3 options are all very valid, its just that they cost real money to implement and are also more advanced than you will probably need outside of a large Enterprise. Feel free to experiment (or implement!) them as wanted of course. Just be aware there will be a cost that you will be paying in terms of dollars and/or equipment.
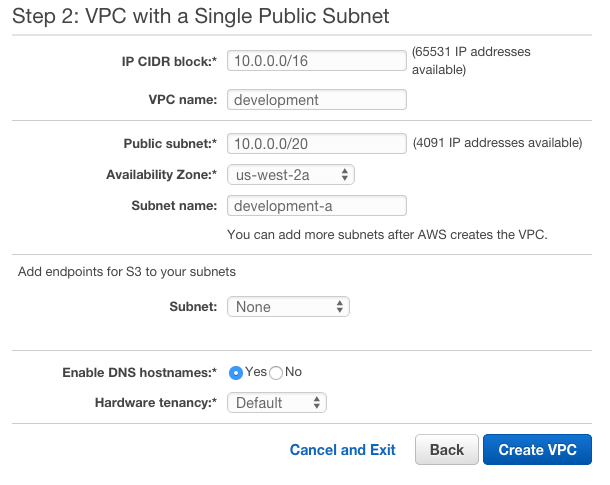
Step 2 dictates the starting point of the structure you will be using, and I only recommend modifying a couple of the pieces at the start. The first is which overall IP range you will use. I like 10.0.0.0/16 for my development ranges, so will stick with that in the first instance. Give your VPC a name (development) and while its unneeded, I like subnets in groups of ~4000 IP addresses as I never plan to have more than 16 subnets within a single VPC. I usually don't go above the number of availability zones for that matter. This is why I specify my first subnet as 10.0.0.0/20. I also choose this to be put within Availability Zone A (I use the US West 2 or Oregon region by default, hence us-west-2a for Availability Zone A in the US West 2 region (or location if you will)). Next up I give my subnet a name, which is usually specific to its purpose and always contains (in my case at least!) the VPC name and the availability zone. For this example we are just going with development-a although that could easily be development-awesomeapplication-a if I was implementing something specific to Awesome Application.
Feel free to ignore the endpoints for S3 - you can always add this later if you need it - its also a new capability in the last few months from AWS which is pretty awesome from a security perspective on what you can now do with S3 to EC2 connectivity.
I also choose to allow DNS hostnames for those applications and OS components that prefer them. Be aware that changing your Hardware tenancy from Default to Dedicated will start costing money. Unless your company requires it, it isn't needed for most systems and applications.
All done? Why Yes! Yes you are!

So what joys did you miss out on by using the wizard and not setting up each component individually? To be honest, no real joy was missed in using the wizard, but you did get some components already configured for you:
- an initial Subnet
- two Route Tables
- an Internet Gateway
- an ACL
- a Security Group
Is that all you need in the VPC? Well, if you aren't planning on using multiple Availability Zones, then sure. But of course you are always going to plan on using more than one Availability Zones as without doing so you run the risk of that dreaded concept of 'unplanned maintenance'. AKA 'outage'. AWS provide a guarantee that unless there is a massive hurricane or earthquake, a 'region' such as US West 2 or Oregon will be always available. The fine print of course specifies that a single Availability Zone may not be up 100%, but that within that region at least one of the Availability Zones will be up and running. This means that unless you use multiple Availability Zones you could find yourself in an outage scenario. I always recommend having a minimum of two instances (spread out across two zones) as a result.
Basic High Availability architecture dictates that you must be able to have one segment of your systems removed at any time with the other remaining segments able to withstand the additional throughput caused by that segment loss. If you have two instances and can't withstand the loss of one, then bring up a third instance. And so on... This can also be augmented by running in multiple regions, but thats a whole different story.
What does that mean for us? Well, given we want more than one Availability Zone, we will have to add some more subnets as a subnet is tied directly to the networking equipment held within a specific Availability Zone. A further digression - while the AWS names are Region and Availability Zone - I believe we would call them massive datacenters that are geographically separated to ensure availability of the region overall. When you see 'Availability Zone A' think 'one large building with many floors full of servers, networking and HVAC equipment'. When you see 'Region' think 'multiple buildings in different parts of the city'. AWS run at a different scale to most companies.
So next up is setting up the remaining subnets.
Adding more Subnets
This is fairly easy to accomplish - switch to the Subnets view in the AWS VPC console:
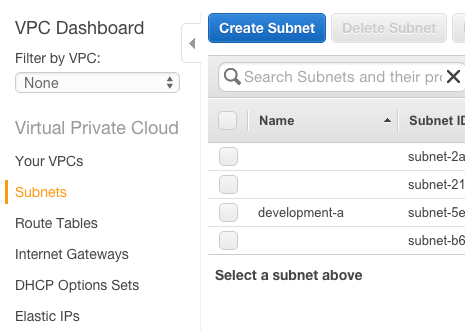
Click the Create Subnet button to start, and update it accordingly. For my second development subnet in zone b, I call it development-b. I choose the relevant development VPC 10.0.0.0/16 | development and specify the us-west-2b subnet. Choosing the CIDR block or IP address range is the hardest part as it usually involves math (or memory if you work with networking enough). The next range after 10.0.0.0/20 is 10.0.16.0/20 which covers the 10.0.16.0 to 10.0.31.255 IP range.
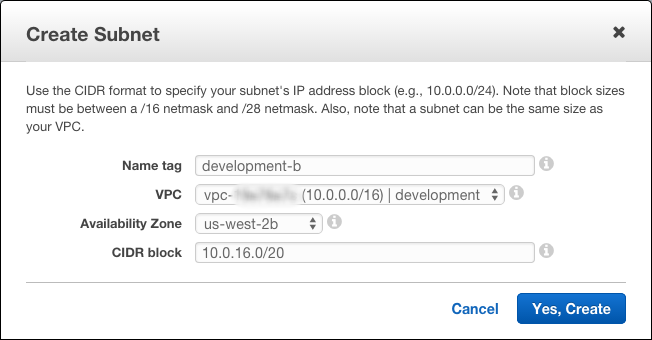
Now that we have created our second subnet for zone b, go ahead and do the same, but for zone c instead. The CIDR range for zone c is 10.0.32.0/20.
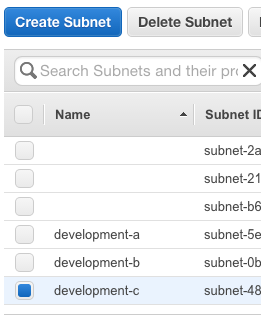
This should leave you with 3 subnets with descriptions to match:
Route Tables
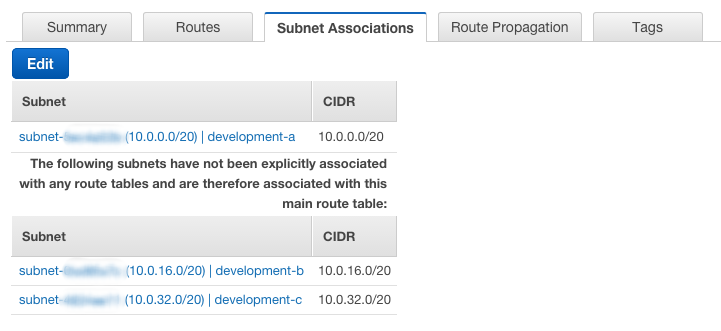
When using the VPC Wizard to create a new VPC, AWS created two Route Tables for you. One is configured as the 'main' route with no subnets associated with it, with the other being more specific and having that initial subnet (development-a) associated with it. What this means is that our two new subnets (development-b and development-c) are not currently associated with a specific route, and therefore will use the 'main' route. Be aware that the 'main' route created via the wizard does not have an Internet Gateway associated with it, so servers in the 'main' route will not be able to talk to anything other than the instances within that same VPC.
Usually I change this so that the three subnets share the same routing mechanism as the initial subnet and therefore have an Internet Gateway. When I'm setting up servers that should not be able to talk to the Internet I put them in subnets associated with the 'main' route of course. In the examples I'm creating however I will want access to the Internet, so to change the association, select the Route Table (from the Route Table menu option on the left) and click the Edit button:
Tick the boxes next to the subnets not currently associated and click Save.
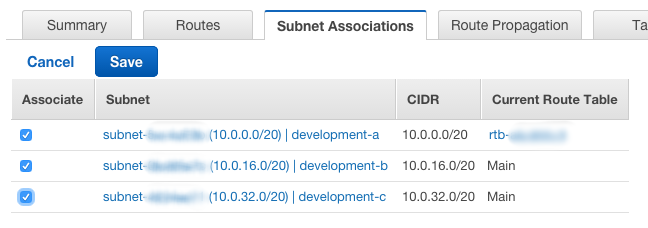
You can keep each subnet in its own route, but that adds configuration effort later as usually you will want instances in the same category to be able to easily talk to each other, hence using the same route is important.
Other VPC Components
There are a few other VPC components that can be configured, but they are usually for more advanced scenarios and I'll only cover them as I get to specific cases that use them. This includes:
- DHCP Option Sets
- Endpoints (S3)
- Peering Connections
- Customer Gateways
- Virtual Private Gateways
- VPN Connections
The Internet Gateway would need further discussion if we hadn't used the VPC Wizard. The Internet Gateway component allows each EC2 Instance to be able to talk to the Internet and also allow the Internet to talk to it (if the appropriate Security Groups and ACLs are configured). Adding one to a Routing Table is pretty easy (create the Internet Gateway, attach it to the relevant VPC, then in the Routing Table config, attach the Routing Table to the Internet Gateway). A VPC can only have one Internet Gateway associated with it, so you only have to do this for an overall VPC once. Routing Tables as previously discussed can be configured to see that Internet Gateway or not as the purpose for the Routing Table dictates.
ACLs also deserve an updated mention. ACLs are stateless, which means if you are using them in a 'deny all, allow only what is needed' mode (another security 'best practice' concept), then you need to specify both incoming and outgoing ports and IP combinations. This can get tricky, especially if the application and protocol being used doesn't give good documentation on what ports are used. The Security Groups are far easier to work with of course.
Which does bring us on to Security Groups. Rather than cover them further here, Security Groups are more important from an EC2 point of view, and I'll cover them as part of the various EC2 posts.
Last, but not least, are Elastic IPs. These are used to keep the same IP address in use while being able to swap out which specific instance is running in the background. Unless you are using an alternative HA system such as Round-Robin DNS, this implies a SPF (Single Point of Failure) implementation and again unless there is a good technical reason to do so, should be avoided, especially in production and public facing systems.
SSL Certificates for Platform (or Web Servers) in my book at least should reside on an ELB, so I've never considered them a good reason for having multiple IP addresses and network interfaces in use on a single Instance.
If you can deal with a short-lived DNS A record (most systems can!) then the bulk of the other reasons behind needing an Elastic IP can be avoided completely. Implementing custom DNS names as part of creating an EC2 instance (this is very easy when also using Route53) is the way to go in order to avoid a more complicated setup involving removing an Elastic IP from one server you are about to decommission and attaching it to a new one without causing an outage or requiring a planned maintenance. If you put the effort (and architecture) in place you too can achieve a zero-downtime system. Elastic IP addresses usually involve some sort of downtime, even if it is limited to only seconds.
Creating the other VPCs
Well, now that you have what is needed for the first VPC (10.0.0.0/16), you should move on to setting up your Operations and Production VPCs.
There is no hard and fast rule for what should be used as the overall IP ranges, but as we have lots to work with, I usually recommend separating out the other VPCs just in case you do want to have multiple development or production environments.
I'd recommend 10.50.0.0/16 and 10.200.0.0/16 or similar for Production and Operations respectively. What you use isn't that important as you will usually reference the internal IP addresses by the VPC name (or subnet name) and hardly ever as the actual IP addresses themselves.
In the examples going forwards I will presume you have gone with 10.50.0.0/16 and 10.200.0.0/16 of course. After setting them up, you should have a subnet list that looks similar to the below:
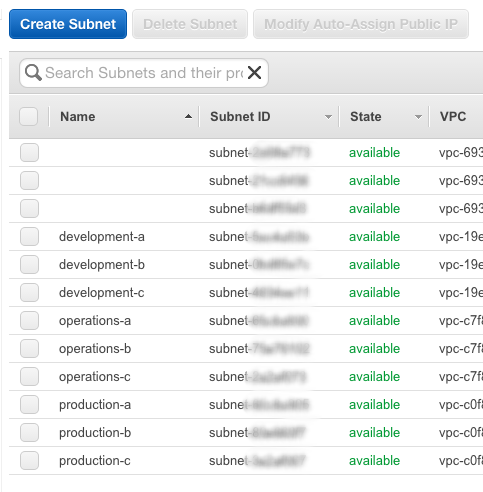
Don't forget to make sure the subnets are attached to the right route and you will be good to go!